


Haven’t you at some point felt vexed at not having the necessary ingredients for getting a dish together? A dish that you’ve been conjuring up in your mind’s eye until it becomes a salivating necessity? And when you’re all agog to launch your ship of culinary delicacies, you’re stopped short owing to a shortfall of ingredients. While there’s plenty of sugar in the larder, there is no gelatine, not even a 5 gm sachet in sight. While there’s sufficient cornflour, there’s no mozzarella. Or for that matter, there isn’t any other variety of cheese either to substitute mozzarella. Having nothing in your baffle tray can be rather baffling.
 It was when I was getting set to put together a Royal Falooda recipe that I realized with dismay that my vermicelli stock – to put it mildly – was depleting. To be honest, the vermicelli was clean-finished, with just an empty wrapper left in the drawer. And the ice-cream that I was under the mistaken notion was lying frozen in the fridge, was polished off by somebody a night prior. Let’s not analyse who it could’ve been that polished off my ice-cream, as knowing that would vex me further.
Well, it isn’t impossible to assemble a falooda without one of the two ingredients, but going without both ingredients was unthinkable. I mean, you’d get a falooda of sorts, but a “royal” one – never.
As I always maintain, necessity is the mother of invention. The grey cells – the right side ones – go a-ticking and then snap comes an idea. How about making your own vermicelli, or more aptly “falooda sev”. God, it was smoother than the original stuff if not better. And if I told you that only just one ingredient went into the sev making process, you’d be shocked. Shell shocked, unlike ’em macaroni shells. Hold on and give me a moment before I fill you in with a blueprint if only to substantiate my claim that dishes can indeed be prepared with just one ingredient.
Here is a list of the mouth-watering recipes listed in the article.
- Falooda Sev Recipe
- Banana Ice Cream Recipe
- Garlic Stir Fry Beans Recipe
- Strawberry Banana Ice Cream Recipe
- Chocolate Fudge Recipe
- Bombay Halwa Recipe
- Mango Mousse Cake Recipe
- Fried Onion Rice Recipe
ONE INGREDIENT WHITE VISION
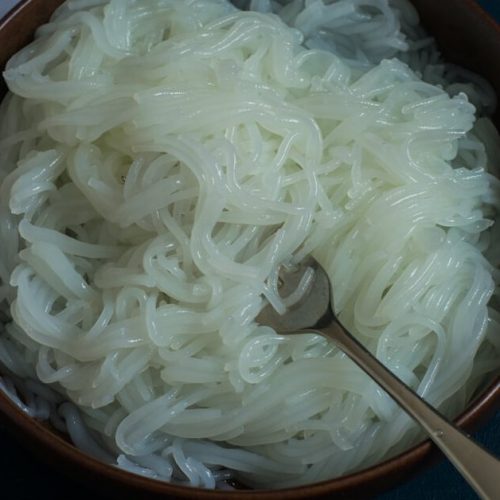
FALOODA SEV RECIPE
Ingredients
- 1 cup corn flour
- 3 cups water
- 1 tray ice cubes
- 3 cups chilled water
- 1 piping bag with small holed nozzle
Instructions
- Take corn flour in a bowl, add water and whisk it with a small hand whisk till it forms a lump-free slurry.
- Heat the slurry in a pan, stirring continuously till thickened. It should be sufficiently thick, almost till a glue-like consistency.
- Pour the gluey cooked mix into a piping bag bearing a nozzle with little holes, taking care to not scald your hands in the process.
- Hold the piping bag over the chilled iced water and squeeze it gently but firmly to ooze out thin strings of the mixture into the water. Form circular movements with a steady squeeze, so as to allow for a formation of circular strands of “sev”.It takes a bit of dexterity to get strands of even thickness; the squeeze pressure makes a difference too apart from the nozzle hole. Rest assured that even broader/ flatter strings will do, as eventually, the sev is likely to be hidden from view among several other falooda ingredients in the glass.
- The strands will appear semi-translucent, which is the way falooda sev has to be.
Voila, there goes our one ingredient recipe! You have saved the effort of having to make a dash to queue up at the grocers, to pick up that one vermicelli ingredient at a cost at that! You eventually figure out how to get going your own “vermicelli” or in local terms your own falooda sev recipe!
Making the falooda sev sparked off more creative ideas for other one and two-ingredient dishes and desserts that turned out incredibly well. No one could tell that the dishes contained just one, or two, or at most three ingredients. So here’s a list of recipes that sure would make you kitchen happy. These recipes will focus on key ingredients, with condiments like salt, sugar and teeny additions like oil or essence not featuring among its main ingredients. These so-called secondary ingredients are invariably always available in your shelf if yours is an alive and running kitchen that is.
As if not to be outdone by the falooda sev, there follows a banana and strawberry ice-cream soft serve that was a keen contender to the “one ingredient falooda sev recipe”.
ONE INGREDIENT SUMMER CHILLED TREAT

HOMEMADE BANANA ICE CREAM RECIPE (PLAIN SOFT SERVE)
Ingredients
- 6 golden bananas (I used Manukau honey, but any brand of honey will do)
- 1-2 tsps vanilla essence
- 2 tbsp milk
Instructions
- Peel the bananas, chop them roughly (into, say, 1-inch pieces) and freeze for as long as it takes (or freeze overnight)
- Blend the frozen banana bits with honey, essence and milk. The blend may seem lumpy initially; so using a long spoon to get the lump blend together will help. Continue to plod on, patiently, till the bananas and strawberries turn nice and velvety smooth.
You may cram down this banana ice cream soon after blending, serving it on a waffle cone or eating it out of an ice-cream bowl. It’s gooey, just like a “soft serve” ought to be and bananalicious!
Or you may choose to transfer the banana soft serve into a metal container and freeze it yet again, to enjoy the ice-cream the next day. Remember that it tends to harden in the freezer, so allow around 10-15 minutes thawing time before serving. I’d rather you blend the ice cream on the day you want to eat/serve it. Eating it straight of the blender is super fun, take my word for it. Freezing the banana soft serve ice cream for a day may alter the taste a tad. In any case, try to avoid freezing it for several days. Blend it the day you want to eat it for best results, straight from the blender will have your guests asking you for the recipe.
As we are going over one-ingredient dishes, I must not forget to add my all-time favourite green veggie dish. It has heaps of garlic which lends the beans an aromatic flavour. Here’s the recipe for this green humility in the form of garlic stir fry beans.
ONE-INGREDIENT GREEN SIMPLICITY
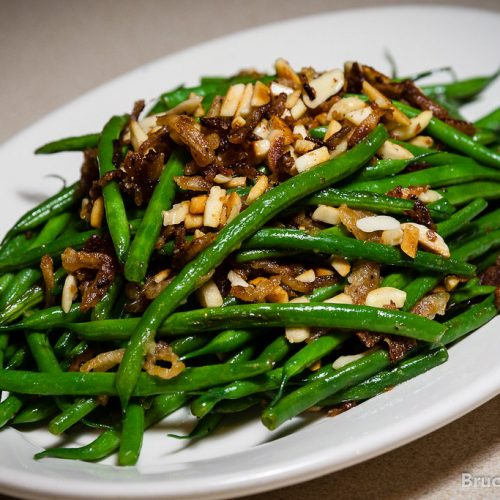
GARLIC STIR FRY BEANS RECIPE
Ingredients
- 250 gms french beans
- 8 cloves garlic (finely chopped)
- 3-4 cups water
- ½-¾ tsp black pepper powder (freshly ground)
- 1.5-2 tbsp butter
- Salt to taste
Instructions
- Wash the french beans, then snip both ends.
- Bring to boil 3-4 cups water with salt doing so on high heat, add the french beans when the water comes to a boil. Let simmer for 5-7 minutes, on low heat till par-boiled.
- When done, remove from fire, drain in a sieved bowl and keep aside.
- Heat a non-stick pan with butter, add the chopped garlic and saute for a few seconds. Add the blanched beans, salt and pepper and saute for a further 3-5 minutes. Turn off the stove, remove the pan from the heat and place on a steaming tray/rack to not allow it to cook further.
- Play around with some ready fried onions, if you have some in stock. Toss a palmful of fried onions over the beans to give it a twist. This is an OPTIONAL step.
Remove the garlic stir fry beans into a ceramic dish; choosing to eat it plain or paired with a chicken salad or rice or both. You are free to add as much garlic as you like, if you are a garlic lover. Do ensure that you add the garlic in small lots so as not to give it an overdose of flavour.
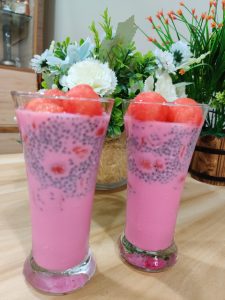
One can never have enough of sweetness. So yet again we’ll embark on a pink ice-cream sensation, which is an extension of the banana ice cream soft serve recipe. This one is similar to the banana ice cream recipe, except that in this case “two” ingredients instead of one will go into its preparation. Nothing like your own homemade strawberry banana ice cream soft serve.
TWO INGREDIENTS PINK FROZEN DELIGHT

HOMEMADE STRAWBERRY BANANA ICE CREAM RECIPE
Ingredients
- 4 golden bananas (medium sized ripe ones, but not overly ripe)
- 10-12 strawberries (washed, cleaned, patted dry, chopped into two and frozen)
- 3 tsps honey (I used an extra tsp of honey as strawberries could be sourish)
- 1-1½ tsps vanilla essence
- Hint of red colour (turns pink when combined with milk)
- 2 tsps strawberry crush (optional)
Instructions
- Peel the bananas, chop into 1 inch pieces and freeze
- Wash the strawberries, de-stem them and pat them dry. Chop them into two, put into a polybag and freeze.
- Blend the frozen banana & frozen strawberries with the honey, essence and milk. The blend may seem lumpy initially; use a long spoon to stir it around if need be. Patiently continue to plod on till the bananas and strawberries mixture turns nice and velvety smooth.
You may slurp the homemade banana strawberry ice cream directly after blending, serving it on a waffle cone or eat it out of an ice-cream bowl. It’s gooey, like a “soft serve” and strawberrilicous.
Or you may choose to transfer the blend into a metal tray/ container and freeze it yet again, to enjoy the ice-cream the next day. Remember that it tends to harden in the freezer, so allow around 10-15 mins thawing time before it gets the consistency of a soft serve. My acid test discovered that eating the ice cream soon after it’s blended is a surefire hit. Freezing is fine if you can’t swipe it clean the same day. The strawberry banana ice cream is best eaten soon after blending, so much so that you’d lick your fingers with delight. This strawberry soft serve has an edge of the banana soft serve.
As if this isn’t enough, there is yet another sweet endearment that comes in the form of a brown fudge. The fudge recipe is so simple to follow that it won’t be a load whatsoever to add this dessert to two or three other existing desserts on the menu.
TWO INGREDIENT BROWN CONFECTION
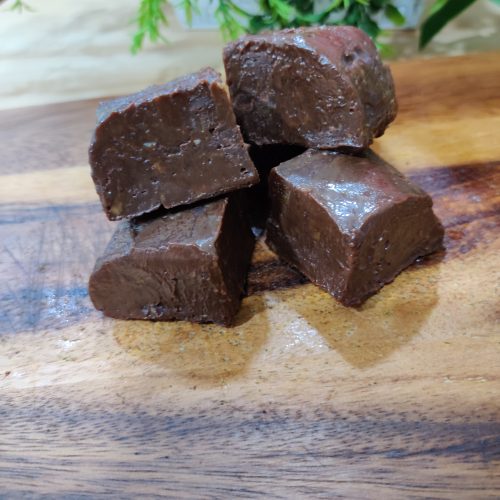
CHOCOLATE FUDGE RECIPE
Ingredients
- 250 gm dark chocolate
- 300-350 gm condensed milk
- 1 tbsp butter (for greasing the pan)
Instructions
- Grease a rectangular metal tray/ container with butter. Then line it with a greased butter paper - arranged vertically as well as horizontally – to enable easy prying out.
- Place a non-stick pan on the stove, pour in the condensed milk placing it on very low heat.
- Then add the dark chocolate (broken roughly into bits) and melt while continually stirring the mixture. It takes around 5 minutes to be well incorporated. (My trick is to break the chocolate inside its wrapper itself, to avoid using a hammer 🙂 to break it or have it fly all over the kitchen table)
- Pour the chocolate-condensed milk mixture into the pre-greased pan. Give the tray a little jig so that the mixture is evenly levelled.
- Set aside till cooled, then refrigerate it for a couple of hours, or more if not set.
- Remove from the fridge, tug gently at the butter paper and voila – there emerges the slab of fudge. Chop it into square bits, into the sizes of your choice.
The refrigerated chocolate fudge tends to sweat if kept out at room temperature too long, hence it is advisable to bring it out from the refrigerator at the time it’s ready to be served. You won’t stop at one piece of fudge; in fact, you’d want to sink your teeth into two at least. No chocolate fudge recipe is easier to follow than this one.
It just keeps getting better. Now that we’re done with a Western confection let’s attempt an Indian one. What better an experiment than the famous Bombay ka Halwa! If you can’t enjoy it owing to locked down sweets shops, go on and fetch some custard powder, sugar and clarified butter and try out this Bombay Halwa recipe.
THREE INGREDIENT ORANGE GELLY BOUNCE
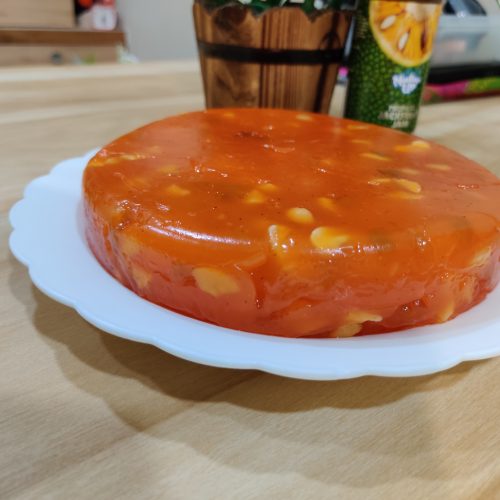
Bombay Halwa Recipe
Ingredients
- 1 cup corn flour (or custard powder)
- 2 cups grain sugar
- 2 tsp lime juice
- 3-4 tsp ghee
- 3 cups water
- A pinch cardamom powder
- A pinch yellow food colour (or orange food colour)
Instructions
- Grease a round baking tray with ghee, taking care to cover the bottom and sides of the tray well.
- Place a pan with sugar and lime juice on a low flame. Bring to a boil till syrupy (or till a 2-thread consistency). See the note below (at the far bottom of the article) for a tip on ascertaining a 2-thread consistency. Don’t fret if you can’t get it, as it needs to be light and syrupy unlike that required of a 1-thread syrup.
- Remove from the stove and keep aside.
- Separately take the custard powder (or corn flour) in a non-stick vessel, add all the water and stir until there are no lumps.
- Turn on the heat, on a low-medium flame. Pour the diluted custard/cornflour slurry in a pan and place the pan on the stove. Stir continuously until the mixture turns thick. Add food colour at this stage and stir in the sugar syrup – in small batches. Don’t add the syrup all at one go as it won’t achieve the jelly like consistency required of a Bombay ka halwa. If you can’t figure out how jellified it must get, use a timer to cook for around 15 minutes on medium-high flame. Don’t stop stirring constantly, an exercise that pays off till its glutinous end.
- Add cardamom powder, and 3-4 tsps of ghee – one tsp at a time – cooking on medium heat and stirring continuously. When it achieves the required gooeyness, remove from the stove and pour the mixture into the pre-greased tray.
- Let cool, for say a half hour (or less) using your discretion. Run a thin knife around the inside edges, place a flat dish over the container and overturn it adroitly. When you hear the sound of a dollop of a drop, you know you’ve got it right.
Chop the gelatinous, bouncy orange delight into squares of your preferred size.
Note 1: This recipe is simple, but needs some degree of experience in sweets making to get the consistencies right. Go with your gut, even if it means not sticking to the recipe. I am of the view that the quality of cornflour or the degree of heat applied can alter the outcome of the dessert.
Note 2: Remember that, if the halwa turns out runny or doesn’t set firmly, take heart and follow this corrective step. Dissolve a tablespoon (or two, of cornflour in a couple of teaspoons of water, then heat the cornflour slurry in a pan and add back the semi-prepared lump of halwa. Stir constantly as you did earlier and as you continue to stir, you will notice an added thickening which is a good sign of having arrived at the right consistency. Don’t fret if the lump is getting too thick and hot to handle (pun intended). Add a teaspoon of ghee, if you may, but avoid too much of ghee as the outcome could get too shiny for comfort.
And when you think you’ve drawn adequate satisfaction from the orange gelled confection, soft serves, fudges and what else, there comes yet another yellow surprise in the form of chilled mango mousse.
THREE INGREDIENT YELLOW FLUFFY SURPRISE
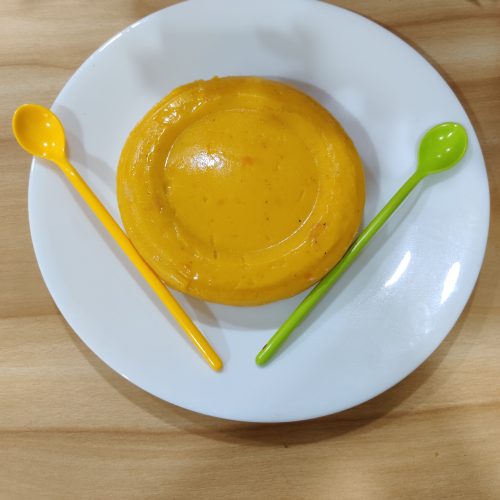
Steamed Mango Mousse Recipe
Ingredients
- 1 cup mango puree (from approx. 2 golden mangoes)
- ⅓rd cup sugar (turns out not too sweet)
- ⅓rd cup milk (for the cornflour slurry)
- 1 tbsp cornflour (to be mixed with milk, to make cornflour slurry)
- ¼ tsp cardamom powder
- 1 tsp vanilla essence
Instructions
- Grease a round baking tray with butter.
- Make a mango puree by blending the flesh of the mangoes. Refer to the note below for removing mango pulp with ease.
- Pour one-third of a cup of milk in a vessel, add the cardamom powder and bring to a boil.
- With the remaining 100 ml milk, add corn flour and whisk till smooth. Ensure there are no lumps, this can seem easier than what meets the eye so take your time to whisk it well. Use a hand whisk.
- Then pour the corn flour mixture into the boiling milk – gradually. Stir continuously till the mixture turns sufficiently thick yet not so thick but one of a pouring consistency.
- Add the blended mango puree to the milk-cornflour mixture stirring gently.
- Soon after, add the sugar and continue to stir till the sugar has melted and is well ensconced in the mixture.
- Turn off the heat and pour the pulpy mixture into the pre-greased tray (you may strain the pulp before it goes into the tray). Let sit till cool. Then refrigerate till well set.
- Remove from fridge after an hour or two, do the knife test before overturning the pulp on a dish. Run a thin knife along the sides till it’s got space enough to drop onto the dish with a soft lop. Cut out soft triangles and serve your guests or yourself.
You may check out the tip below for how to remove the flesh of the mango, easily. The chilled goodness is sure to be a hit at home, it’s velvety soft and slicing it feels as though you’re cutting through air. A fluffy and divine mango mousse dessert.
It’s one of those days when you’re short of veggies or fish and meats to cook yourself a meal. Worse, the stores are closed and so is Swiggy. So, you set sail on a different route. Moreover, traditional lentil gravies, rice biryanis and elaborate curried fish/meats are overemphasized. Pasta or pizzas anyone? Hell no, these are also done to death in my view.
As there was rice cooking anyway on the stove, and a few eggs sitting in the fridge, I merely fried some – eggs I mean. Onions, which are permanent members of any kitchen, rarely do a disappearing act. Well, I sliced and fried the onions too. The combination of the three ingredients – rice, eggs and fried onions, reminded me of an Italian “riso“ combination I’d eaten with relish at a street-side cafe in Europe. The dish was unadorned except for a few Italian sauces served on the table. As for me, it’s possible to have a feast even with just sauces like Marinara, Bolognese for Pesto for company. Quite often I substitute traditional gravies with these Italian sauces. It’s not only delicious but offers a reprieve from cooking time too.
THREE INGREDIENT QUICK MEAL
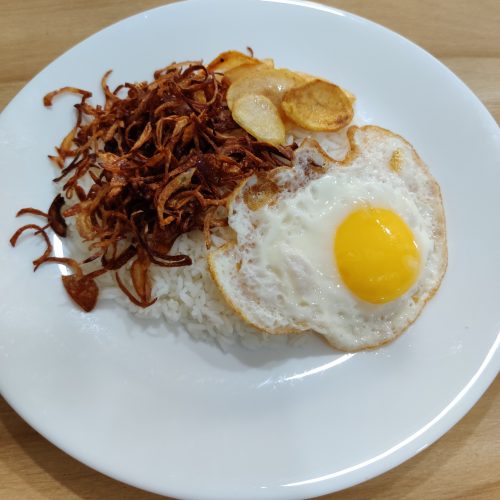
FRIED ONION RICE QUICK MEAL RECIPE
Ingredients
- ½ cup rice
- 3-4 medium sized onions (thinly sliced)
- 1 egg (fried, sunny side up)
- oIl (for deep frying)
- salt to taste
- Italian sauces (handy ones, of your choice)
Instructions
- Wash rice and boil it in 2 cups of water, with salt to taste.
- Take a small frying pan with a teaspoon of oil, break an egg into it and fry it sunny side up. Wait a couple of minutes before removing the fried egg. Ensure that the underside is crisp before using a silicone spatula to remove the fried egg from the frying pan. (If you remove the fried egg soon, it runs the risk of breaking midway).
- Next, slice the onions and use the same pan for frying them. Use enough oil to dunk the onions to enable deep-frying. Fry till a golden brown, and crisp. Remove when done, and place the onions on an absorbent tissue.
- Take a serving of rice onto a ceramic dish, arrange the deep-fried onions on one side of the rice heap and drape the fried egg on the other side.
Tada, there you have a complete meal! If you like to add another dimension to it, try placing garlic stir-fry French beans (recipe above) alongside the onion rice or even a simple three-bean salad could add effect. If not, just get those unemployed Italian sauces (recipe hyperlinked here) from your refrigerator and dress your onion fried rice with them.
Tip 1
To know if you’ve achieved a two-thread consistency, take a few drops of sugar syrup into a small bowl of water. Drop a few drops of the sugar syrup into the water when you think it’s arrived at the right consistency. Pick up the sugar blob that forms in the water – between the thumb and the forefinger – stretch it back and forth an inch. If it gives you a two-string stretch – you’ve achieved the correct consistency. In other words, you will see two sticky threads sticking between the fingers – which is a fine indicator. Don’t overly stress yourself on achieving this as it’s easier than obtaining a one-thread consistency.
Tip 2
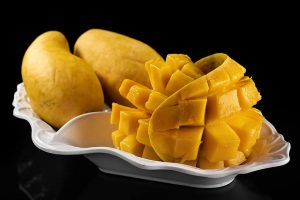 Removing the flesh of a mango is best done by the following two easy methods. Slicing the mango on either side, close to the seed. Using a thin-edged spoon to scoop out the flesh from the sides and even from the adjacent sides.
Alternatively, you could try running a thin knife through the pulp of the mango slices. Do so vertically first, then do so with a horizontal slant to form diamond-shaped mango cubes. Doing so makes it easy to pry out the mango cubes.
There are enough recipes in this article to keep you busy for days. Or even longer if you’re already up to your neck with other commitments. You have an assortment of experiments to choose from – right from mains to desserts to confection. Look at it any which way, and you have a winner.


5 Comments
Carmelita, in these times of scarcity, your recipes of just 2 or 3 ingredients are a real boon.
Priya
Am glad it is of benefit to you and several others who find grocery hunting a challenge or those who haven’t the faintest idea on how to make the best of the few ingredients they have at home.
Carmelita, in these times of scarcity your recipes of just two or three ingredients are a real boon.
Priya
It’s strawberry season here, and with summer soon approaching, will definitely give the Strawberry Banana Ice cream recipe a try. Halwa is one of my all-time favourite desserts . This Christmas, it’s going to be Halwa instead of guava cheese.
Oh I wish there were more strawberries available here!
Halwa is far easier to prepare than gauva cheese and this recipe will taste like the halwa from the mithaiwala.